Note
Access to this page requires authorization. You can try signing in or changing directories.
Access to this page requires authorization. You can try changing directories.
VMware Live Site Recovery is a disaster recovery solution designed to minimize downtime of the virtual machines in an Azure VMware Solution environment if there was a disaster. VMware Live Site Recovery automates and orchestrates failover and failback, ensuring minimal downtime in a disaster. Also, built-in nondisruptive testing ensures your recovery time objectives are met. Overall, VMware Live Site Recovery simplifies management through automation and ensures fast and highly predictable recovery times.
VMware vSphere Replication is VMware's hypervisor-based replication technology for VMware vSphere VMs. It protects VMs from partial or complete site failures. In addition, it simplifies DR protection through storage-independent, VM-centric replication. VMware vSphere Replication is configured on a per-VM basis, allowing more control over which VMs are replicated.
Note
The current version of VMware Live Site Recovery in Azure VMware Solution is 9.0.2.1. VMware Live Site Recovery supports Stretched Cluster, see What's new
Supported scenarios
VMware Live Site Recovery helps you plan, test, and run the recovery of VMs between a protected VMware vCenter Server site and a recovery VMware vCenter Server site. You can use VMware SRM with Azure VMware Solution with the following two DR scenarios:
- On-premises VMware vSphere to Azure VMware Solution private cloud disaster recovery
- Primary Azure VMware Solution to Secondary Azure VMware Solution private cloud disaster recovery
- Azure VMware Solution vSAN stretched clusters to Azure VMware Solution private cloud disaster recovery
The diagram shows the deployment of the on-premises VMware vSphere to Azure VMware Solution private cloud disaster recovery scenario.

The diagram shows the deployment of the primary Azure VMware Solution to secondary Azure VMware Solution scenario.
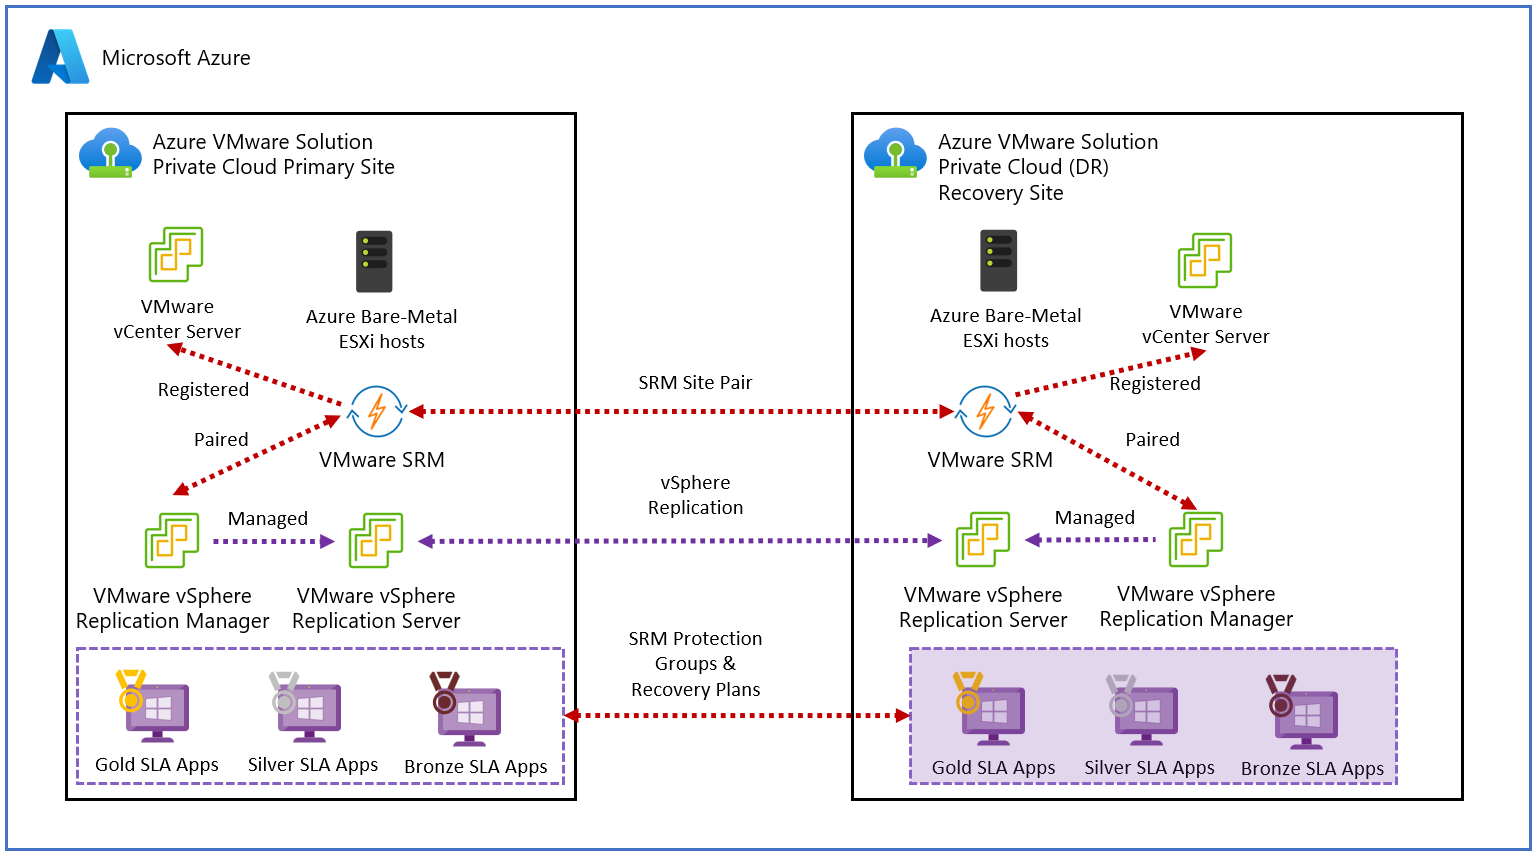
You can use VMware SRM to implement different types of recovery, such as:
Planned migration occurs when both primary and secondary Azure VMware Solution sites are running and fully functional. It's a regulated migration of VMs from the protected site to the recovery site where no data loss is expected when migrating workloads.
Disaster recovery using SRM can be required when the protected Azure VMware Solution site goes offline unexpectedly. VMware Site Recovery Manager orchestrates the recovery process with the replication mechanisms to minimize data loss and system downtime.
In Azure VMware Solution, only individual VMs can be protected on a host by using VMware SRM in combination with VMware vSphere Replication.
Bidirectional Protection uses a single set of paired VMware SRM sites to protect VMs in both directions. Each site can simultaneously be a protected site and a recovery site, but for a different set of VMs.
Important
Azure VMware Solution doesn't support the following:
- Array-based replication and storage policy protection groups
- VMware vVOLs Protection Groups
- VMware SRM IP customization using SRM command-line tools
- One-to-Many and Many-to-One topologies
- Custom VMware SRM plug-in identifier or extension ID
- VMware Cloud Disaster Recovery (VCDR)
- VMware Live Site Recovery – External Datastore support status, see What's new
Prerequisites
Ensure you provide the remote user the VMware VRM administrator and VMware SRM administrator roles in the remote vCenter Server.
Scenario: On-premises to Azure VMware Solution
Azure VMware Solution private cloud deployed as a secondary region.
DNS resolution to on-premises VMware SRM and virtual cloud appliances.
ExpressRoute connectivity between on-premises VMware vSphere and Azure VMware Solution - 2 Gbps.
Scenario: Primary Azure VMware Solution to secondary
Azure VMware Solution private cloud must be deployed in the primary and secondary region.

Connectivity, like ExpressRoute Global Reach, between the source and target Azure VMware Solution private cloud.

Install SRM in Azure VMware Solution
Note
An evaluation license is included during the initial installation phase. Customers must obtain a Live Site Recovery license directly from Broadcom Use the Two-site Topology with one vCenter Server instance per PSC deployment model. Also, make sure that the required vSphere Replication Network ports are opened.
- In your on-premises data center, install VMware SRM and vSphere Replication.
- In your Azure VMware Solution private cloud, under Manage, select Add-ons > Disaster recovery.
- The installation process involves multiple steps outlined in our backend workflow. Instead, you can install VMware SRM with vSphere Replication as an add-on service from your Azure VMware Solution private cloud.
- From the Disaster Recovery Solution drop-down, select VMware Live Site Recovery.
- Select agree with terms and conditions, and then select Install.
Install the vSphere Replication appliance
After the VMware SRM appliance installs successfully, you'll need to install the vSphere Replication appliances.
- From the Replication using drop-down, on the Disaster recovery tab, select vSphere Replication and then select Install.
- Once installed, verify that both VMware SRM and the vSphere Replication appliances are installed.
Tip
The Uninstall button indicates that both VMware SRM and the vSphere Replication appliances are currently installed.
Configure site pairing in vCenter Server
After installing VMware SRM and vSphere Replication, you need to complete the configuration and site pairing in vCenter Server.
- Sign in to the vSphere Client as cloudadmin@vsphere.local.
- Navigate to Site Recovery, check the status of both vSphere Replication and VMware SRM, and then select OPEN Site Recovery to launch the client.
- Select NEW SITE PAIR in the Site Recovery (SR) client in the new tab that opens.
- Enter the remote site details, and then select NEXT.
Note
An Azure VMware Solution private cloud operates with an embedded Platform Services Controller (PSC), so only one local vCenter Server can be selected. If the remote vCenter Server is using an embedded Platform Service Controller (PSC), use the vCenter Server's FQDN (or its IP address) and port to specify the PSC. The remote user must have sufficient permissions to perform the pairings. An easy way to ensure sufficient permissions is to give that user the VRM administrator and SRM administrator roles in the remote vCenter Server. For a remote Azure VMware Solution private cloud, CloudAdmin is configured with those roles.
Select CONNECT to accept the certificate for the remote vCenter Server. At this point, the client should discover the VMware VRM and VMware SRM appliances on both sides as services to pair.
Select the appliances to pair and then select NEXT.
Select CONNECT to accept the certificates for the remote VMware SRM and the remote vCenter Server (again).
Select CONNECT to accept the certificates for the local VMware SRM and the local vCenter Server.
Review the settings and then select FINISH.
Note
The user with sufficient permissions should have VRM administrator and SRM administrator roles given to them in the remote vCenter Server. The user should also have access to the remote vCenter Server inventory, like folders and datastores. For a remote Azure VMware Solution private cloud, the CloudAdmin user has the appropriate permissions and access.

You see a warning message indicating that the embedded VRS in the local VRM isn't running. The warning is because Azure VMware Solution doesn't use the embedded VRS in an Azure VMware Solution private cloud, it uses VRS appliances instead.
Migrate vSphere legacy replications to enhanced replication
WARNING - Don't run Reprotect during migration. After you enable the embedded replication server (embedded VRS), reprotection fails for any remaining legacy replications. Don't run Reprotect until you migrate all legacy replications across all your site pairings to enhanced replication and verify them in Step 5. This restriction also applies if your embedded VRS was already enabled before you started this procedure. Enabling the embedded VRS alone doesn't migrate your existing replications.
Audience: Azure VMware Solution customers performing the migration. This migration is a prerequisite to performing upgrades to Protection and Recovery as recommended by Broadcom. Prerequisites and Best Practices for Protection and Recovery Upgrade Perform the same procedure on each Azure VMware Solution private cloud where you configured legacy replications. Use this step to migrate your existing legacy replications to enhanced replication.
1. Check whether the embedded replication server is enabled
Before you migrate any replications, check the replication server list in Site Recovery.
- Open the relevant site pair.
- Go to Site Pair > Configure > vSphere Replication > Replication Servers.
- Check whether an Embedded Replication Server entry is present with status Connected.
- Follow the applicable path: | Observation | Next action | |---|---| | Embedded Replication Server is present. | Proceed to Step 4: Reconfigure legacy replications to enhanced replication. | | Embedded Replication Server is not present. | Proceed to Step 2: Submit the Run Command to enable enhanced replication. |
2. Submit the Run Command to enable enhanced replication
Perform this step only if Embedded Replication Server wasn't present in step 1. If it was present, skip feature enablement and proceed to Step 4: Reconfigure legacy replications to enhanced replication. Before enabling: Don't run Reprotect after enablement until you migrate and verify all legacy replications across all your site pairings.
- In the Azure portal, open your Azure VMware Solution private cloud.
- Under Operations, select Run command.
- On the Packages tab, select the latest available Microsoft.AVS.DisasterRecovery package.
- In the selected package's command list, select Enable-EnhancedReplication.
- Select the Run command button.
- In the Run command - Enable-EnhancedReplication pane, don't change the default options.
| Option | Default shown |
|---|---|
| WhatIf | False |
| Confirm | False |
| Retain up to | 7 days |
| Specify name for execution | Keep the prefilled execution name; the following screenshot shows an example. |
| Timeout | 30 minutes |
- Select Run to submit the command. Submitting the command isn't confirmation that feature enablement is complete. Verify completion before proceeding.
3. Verify that the embedded replication server is available
After submitting Enable-EnhancedReplication:
- In the Azure portal, open Run command > Run execution status and confirm that the submitted command completed successfully.
- Return to the relevant site pair in Site Recovery and open the Replication Servers screen used in step 1.
- Confirm that Embedded Replication Server is now listed with status Connected, as shown in the following image. If the command fails, or the embedded replication server isn't present or connected, stop before migrating replications and contact Azure Support.
Note
Seeing the embedded server confirms the feature is enabled, but it doesn't indicate that your existing legacy replications are already migrated.
4. Reconfigure legacy replications to enhanced replication
- In Site Recovery, open the Replications tab for the relevant site pair.
- Select all the legacy replication VMs that you want to migrate, and then select Reconfigure.
- On the Replication mode page, select Enhanced replication, and then select Next.
- On the Replication settings page, ensure Enable network encryption for VR data is selected. Enhanced replication requires network encryption. If it's not enabled, the wizard displays:
Enhanced vSphere Replication requires network encryption. The VM can't use enhanced replication. Select Enable network encryption for VR data if it's unchecked. Preserve your existing replication settings unless you want to change them. Select Next, review the settings on Ready to complete, and finish the wizard. Wait for reconfiguration to complete before checking the migrated replications.
5. Verify the replication mode for all migrated replications
Return to the Replications tab.
For each migrated replication, confirm that the Replication Server column shows Enhanced replication instead of a legacy replication servers or IP address.
Repeat the reconfiguration and verification steps for all remaining legacy replications that need to be migrated.
Repeat the procedure for all your site pairings, checking feature enablement for each pairing and migrating and verifying its legacy replications. Completion criterion: You completed the procedure for all your site pairings, and all previously legacy replications across those pairings show Enhanced replication in the Replication Server column. No legacy replications remain. You can resume Reprotect only after you meet this completion criterion. Also verify replication health and resolve any outstanding protection or replication errors before you run Reprotect.
Replication mode isn't replication health. The example screenshot shows Enhanced replication but also shows Not Active in the Status column. This verifies the mode change only, not successful data replication. Investigate any inactive or error status before declaring the replications healthy.
VMware SRM protection, reprotection, and failback
After you created the site pairing, use the following VMware documentation for end-to-end protection of VMs from the Azure portal.
VMware Live Site Recovery Licensing in Azure VMware Solution
VMware Live Site Recovery supports two licensing models in Azure VMware Solution. The setup process depends on the type of license you have.
25-Character live site recovery license key
If you have a standard 25-character Live Site Recovery license key, use the following steps:
- Sign in to the Azure VMware Solution portal
- Navigate to Add-ons
- Select the Disaster Recovery tab
- Enter the 25-character license key
- Save the configuration
Offline mode base license
For offline mode base license use the following steps and instructions:
- Set up offline mode for VMware Live Site Recovery.
- Remove the offline mode license for VMware Live Site Recovery.
Note
Customers are responsible to purchase and apply Live Site Recovery by following Broadcom's instructions. Customers are requested to create Broadcom ticket for license issues.
Uninstall VMware SRM
Note
You can't delete recovery plans that are running. You can't delete a protection group that is included in a recovery plan. You can't delete vSphere Replication protection groups that contain VMs on which protection is still configured. Breaking the site pairing removes all information related to registering Site Recovery Manager with Site Recovery Manager, vCenter Server, and the Platform Services Controller on the remote site.
If you no longer require VMware SRM, you must uninstall it in a clean manner. Before you uninstall VMware SRM, you must remove all VMware SRM configurations from both sites in the correct order. If you don't remove all configurations before uninstalling VMware SRM, some VMware SRM components, such as placeholder VMs, might remain in the Azure VMware Solution infrastructure.
- In the vSphere Client, select Site Recovery > Open Site Recovery.
- On the Site Recovery home tab, select a site pair and select View Details.
- Select the Recovery Plans tab, right-click on a recovery plan and select Delete.
- Select the Protection Groups tab, select a protection group, and select the Virtual Machines tab.
- Highlight all VMs, right-click, and select Remove Protection. Removing protection from a VM deletes the placeholder VM from the recovery site. Repeat this operation for all protection groups.
- In the Protection Groups tab, right-click a protection group and select Delete.
- Select Site Pair > Configure and remove all inventory mappings. Select each of the Network Mappings, Folder Mappings, and Resource Mappings tabs. In each tab, select a site, right-click a mapping, and select Delete.
- For both sites, select Placeholder Datastores, right-click the placeholder datastore, and select Remove.
- Select Site Pair > Summary, and select Break Site Pair.
- In your private cloud, under Manage, select Add-ons > Disaster recovery, and then select Uninstall the replication appliances.
- Once replication appliances are uninstalled, from the Disaster recovery tab, select Uninstall for the Site Recovery Manager.
- Repeat these steps on the secondary Azure VMware Solution site.
Support
VMware Live Site Recovery is a Disaster Recovery solution from VMware by Broadcom. Microsoft supports the installation and uninstallation of VMware Live Site Recovery and vSphere Replication Manager, as well as the scaling up or down of vSphere Replication appliances within Azure VMware Solution.
For any other issues, customers are requested to contact Broadcom for support regarding site configurations, licensing issues, replication, pairing failures, and DNS-related problems.
VMware and Microsoft support teams engage each other as needed to troubleshoot VMware SRM issues on Azure VMware Solution.